

I recently started a YouTube channel. It's the educational kind where I explain cool technologies. My inspiration was channels like Wendover Productions and Kento Bento. One thing I want to get right is animations. I have previously watched a lot of videos by 3Blue1Brown. Their animation is very useful for explaining complex topics.
The problem is that I’ve never used tools like After Effects before. I also don’t want to learn or pay for it. Actually, I can’t even use it since I’m running Linux.
Being a “good” programmer, I thought — why not make the animation in React? What could go wrong?
React is my home turf
Now, I wanted something programmable. Somewhere you can tweak text and numbers instead of manually aligning elements. I don’t want to copy-paste hundreds of times when it could be a simple loop. And the idea of reusing past components is appealing to me.
Why React though? Well, it’s what I’m most familiar with. All my projects are built using it and I can create layouts with CSS pretty quickly. In fact, I’ve created a game with React + CSS Grid for a game jam in the past.
And most importantly, it’s fun!
The alternative was painful
For comparison's sake, I animated a simple scene in Davinci Resolve using a few tutorials from YouTube. This is the result:
That’s it. But for such a simple scene, it was a major pain to create. Here’s what the node graph looks like. Even worse, if I want to change a group of items slightly, I have to update them separately.

First scene concept
I had an image of what I wanted to illustrate. The video is about how the PS3 was used as a supercomputer. For that, a bunch of them were clustered into a single machine. I wanted to show how many PS3s were used. Showing a number is fine but I also wanted to show each physical machine.
First, a single PS3 would appear, then a few dozen, then hundreds and then to its final amount. All while animating the previous ones to their new position. Here’s the result:
The project setup
To bootstrap the project, I used Next.js. This part doesn’t matter much. But its file-based routing is convenient for separating different scenes. I can just create a new file for each scene.
Animating Library
While researching for this, I had an idea of scenes I want to make. For example: Graphs, Pie charts and illustrating how a CPU work with simple boxes. One of the ideas of using React is to leverage its large amount of open-source libraries.
However, It turns out that most packages don’t handle animation very well. And if it has any, it’s likely not configurable. So I began looking for an animation library and came across Anime.js.
Anime.js is great because I can simply define the initial state and the goal. Anime.js will handle everything in between.
Here’s a snippet of the final code:
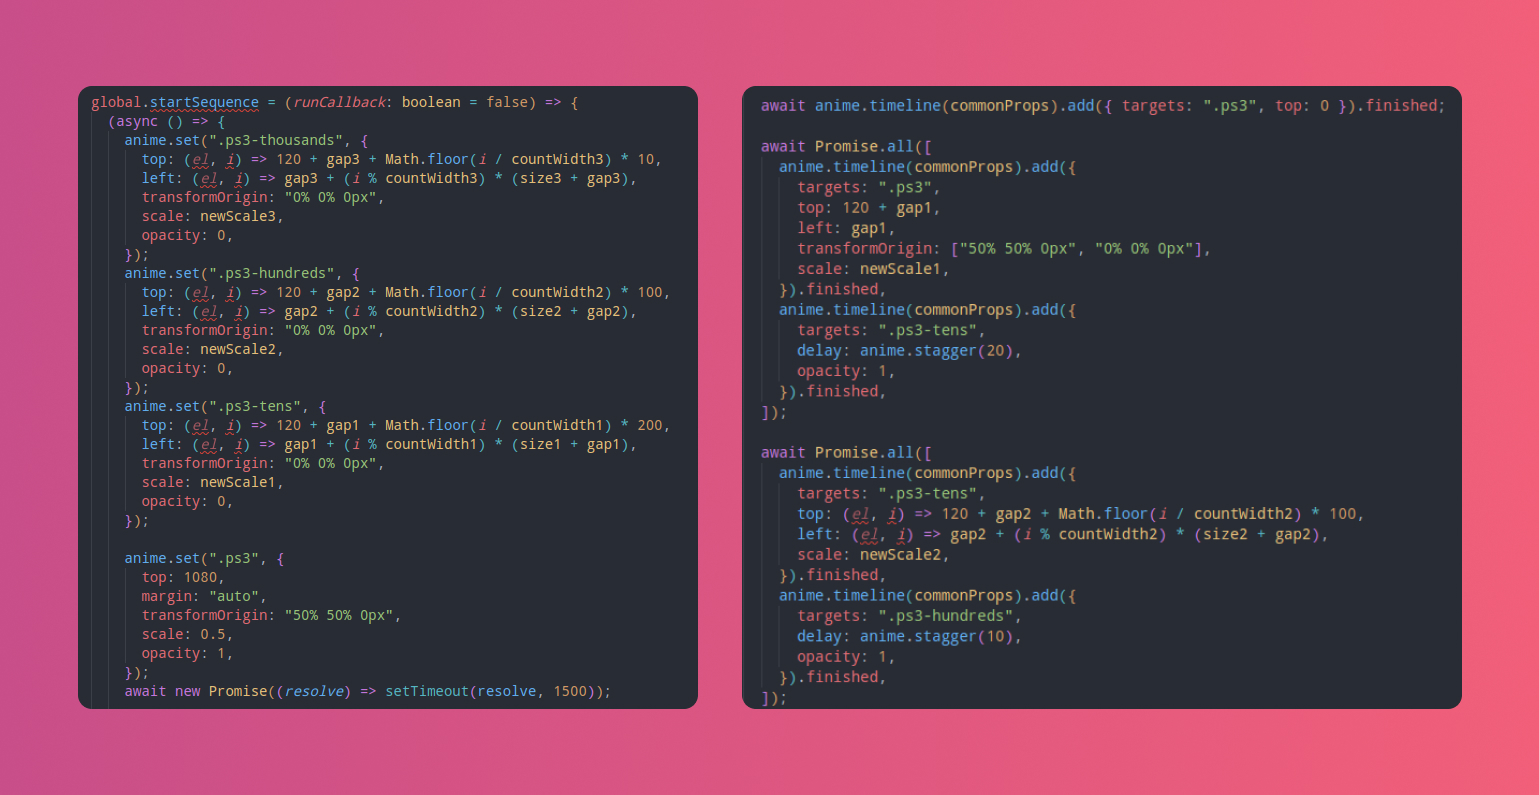
There are some maths involved to calculate where each PS3 image should go. However, the animation calculation is all done by Anime.js. Not bad.
Recording & Exporting
Now the harder part is finding a way to record and export the animation. I wanted to automate this process. Recording my screen sounded like a very crude way of doing this. Ideally, it should take its time to render each frame as it needs and create an mp4 file. This is so that:
Even if the animation doesn’t run smoothly on my machine, it still will show up smooth on the recording
The resolution will be correct. My screen is HD so I can capture that but what if I want a larger resolution? Recording this way would also take a whole monitor which is annoying.
Problems and Iterations
rrweb + rrvideo
In the end, I had to experiment quite a few times. First, I tried using rrweb since it was something that was already on my radar. The idea is I would record using that and convert it into a video using rrvideo.
This approach was… alright. It’s an alternative to recording my screen. The advantage is that rrvideo spawns a separate chrome instance (through puppeteer). This allows the recording to run headlessly.
The disadvantage is it brings a bunch of complexity to an otherwise simple task. The initial recording step is also an unnecessary process.
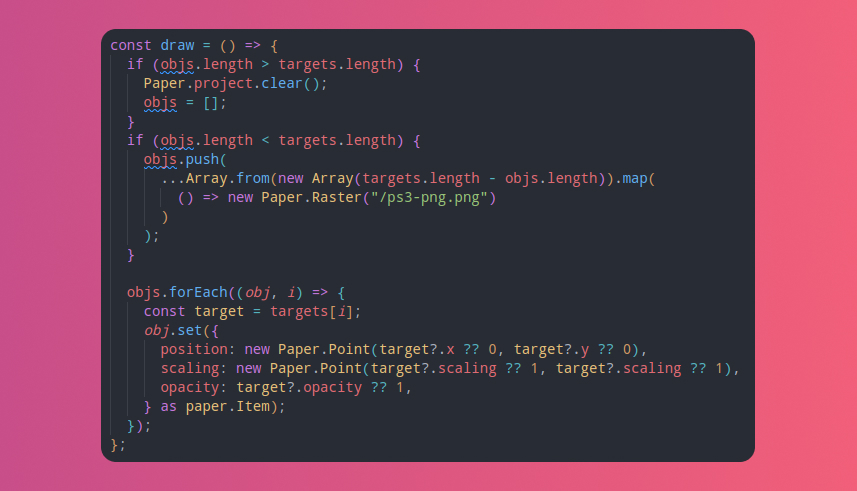
Canvas w/ paper.js
The previous Anime.js with HTML+CSS approach worked with a few elements. But it didn’t run very well once I added hundreds of images. Each PS3 was an image and rendering a thousand of them was not great for performance. I wasn’t able to get it running at 30 fps for the whole sequence.
To solve that issue, I searched for some solutions using canvas. I didn’t want to work with pure canvas so after doing some research, I settled with paper.js.
Using paper.js was convenient because it allows me to reuse the Anime.js logic I have previously written. Instead of modifying the DOM element directly, I modified it to update a JSON object. Then I use that object to update the canvas every tick.
It’s not very elegant but it worked so good enough!
Canvas Capturing
I also tried to find a better recording method. Since I’m now using canvas, there are some solutions to recording that seemed quite elegant. For example, paper.js uses requestAnimationFrame to achieve its smooth animation. There are libraries like ccapture.js that hooks into the various methods like requestAnimationFrame and setInterval, allowing it to render each frame separately.
Using this approach works but it was quite troublesome to get working. For example, the animation loop needs to be started before the recording starts. This is quite annoying to deal with. It also means that it’s not possible to add a delay between animations easily.
Recording manually was a good enough solution
With that problem in the way, I decided to record the screen manually instead. For this, running a simple ffmpeg command was good enough to get the results I wanted. You can see the results in the 2nd video above.
Utilizing other React libraries
The next scene I had in mind was an animated pie chart. There are so many charting libraries around that I was sure one of them would fit my needs. The pie chart below was rendered using recharts, utilizing its mount animation. To get the results, I recorded my screen like the first scene.
The actually useful animation!
And finally, the reason I wanted my videos to be animated in the first place. Below is a simple illustration of the difference between how the CPU processes data compared to the GPU. It helps to illustrate the point instead of simply saying it in words.
For this scene, I decided to research other ways to achieve this. The Anime.js method was decent but it was rather clunky particularly in terms of timing it. Meanwhile, the canvas method was performant but I’d rather use a “proper” tool if I can’t leverage React’s tooling or even CSS.
Target based animation
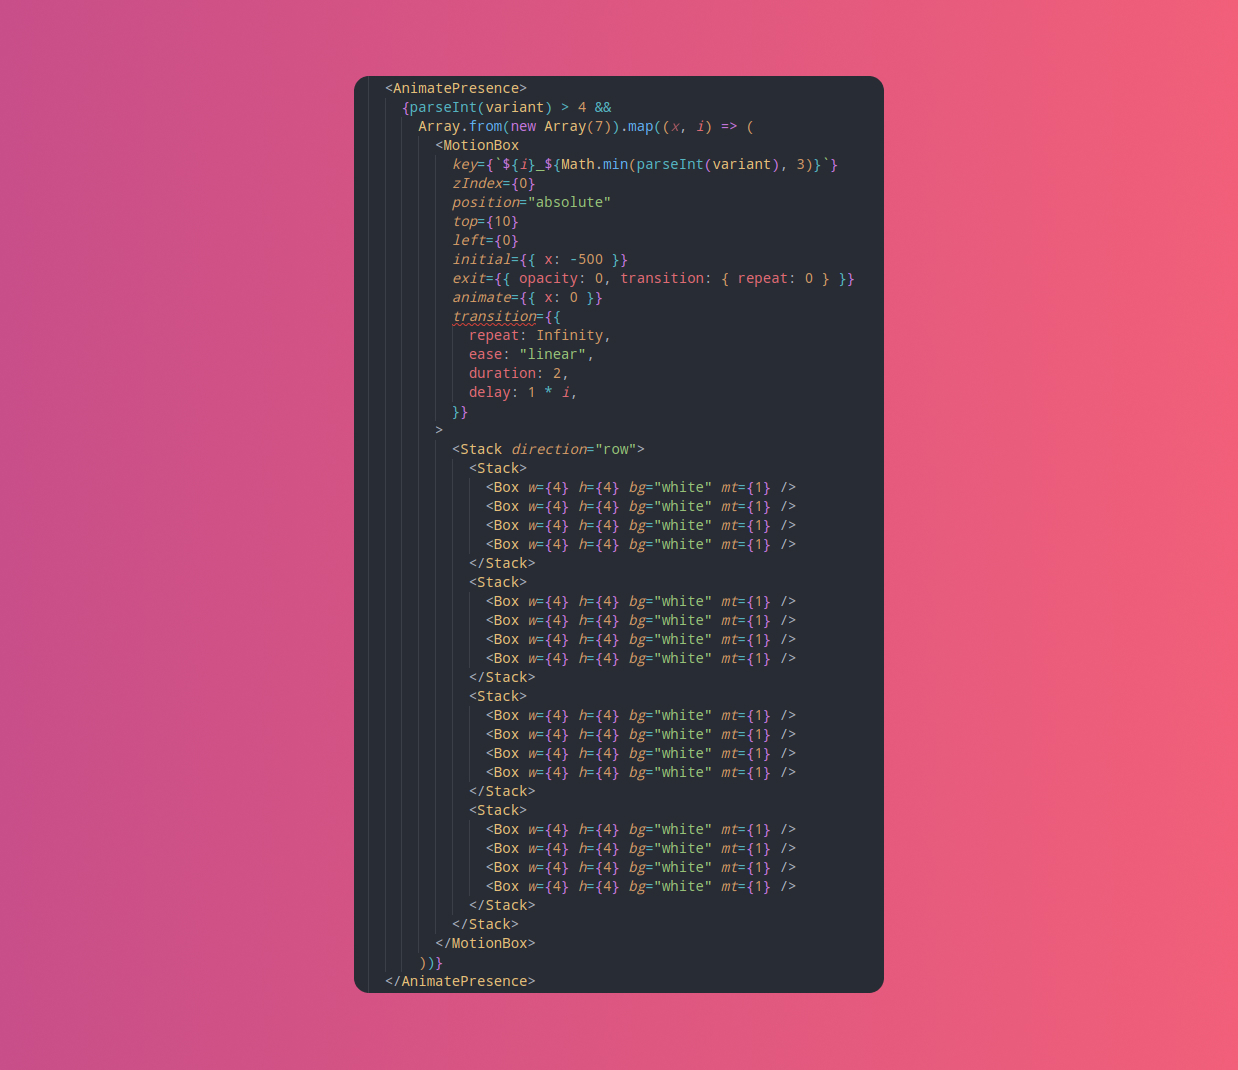
A bit more research led me to Framer Motion. I’ve heard about the library in the past. I hadn’t used it since I never needed it. But I did experience it through other libraries like the excellent Chakra UI library.
Like Anime.js, Framer motion lets you define the result you wanted. The library will then handle the animation part. However, Framer motion has the added benefit of having a nicer workflow. It’s all directly in React. In my React code, I can simply define what to render depending on a state. Then, I can play around with the state to change between scenes. Framer motion will handle the rest.
After hooking the state value to key press events, I can control when I want to transition with a button press. This also allows me to match the animation with my video.
Below is how the white blocks in my video that flow between the RAM and GPU is defined. Isn’t it nice? To start the animation I only need to render it. In this case, incrementing the variant counter.
CSS layout animation
Another added benefit of Framer Motion is its layout animation capabilities. With Anime.js, I’m limited to animating linear values. But what if I added a new element or changed a flexbox property? It wouldn’t work at all. Thankfully, Framer Motion handles this use case nicely.
Transparency is a chore to deal with
So that was the stack that I used for the rest of the animation. There are other details and methods that I had to deal with in the making of this video. Many of them are omitted since they never went anywhere.
But one detail I had to work around is transparency. To get it working, I set the animation to have a green background. In Davinci Resolve, I can then mask/key the background away. This worked but it limited the colors I could use in my animation.
Should you do it?
Probably not. I’m sure there are good ways of doing this without code. Though I can’t recommend any since I’ve never tried them. But if you are someone who managed to read this far, then you're probably savvy enough to do something like this!
Future solution
Now that I’m planning for a second video, there are other stuff that I’d like to try. For example: Motion Canvas. This tool is authored by someone who was looking for something similar to me. He actually has a whole video explaining the tool. It included various features like timing the animation with audio and rendering it per frame. It also renders the animation as an image sequence. I’m assuming this would solve the transparency problem nicely.
If you know other tools that solve this in a good way, do let me know!
That's it for now. If you’re interested in the final video, you can watch it here: https://www.youtube.com/watch?v=kOjgPTj9MKM. If you like this article, you might like the contents of the video too.